The sizzle of a steak on the grill, the warmth of an open fire on a cool evening, and the joy of sharing a meal with loved ones—these are the hallmarks of a great outdoor gathering. While a portable grill gets the job done, a permanent, professionally built brick BBQ transforms a simple backyard into a stunning, functional outdoor kitchen and a focal point for entertaining. It’s an ambitious project, but the immense satisfaction of building a beautiful, durable structure with your own hands is an unparalleled reward. Using the elegant and robust design shown in our reference image, this comprehensive guide will walk you through the entire process of building a magnificent brick outdoor oven and grill, from initial planning to the final, delicious payoff.
Part 1: The Blueprint for Backyard Bliss – Planning and Preparation
Before you even think about laying the first brick, meticulous planning is the foundation of a successful project. A solid plan will save you time, money, and headaches down the road.
Site Selection and Foundation: The first critical step is choosing the perfect location. Your brick BBQ needs a flat, stable, and spacious area. It should be situated away from flammable structures like wooden fences, sheds, or your home. Consider the prevailing wind direction; you want smoke to be carried away from your seating areas and out of your guests’ faces. The sheer weight of a brick structure of this size demands a proper, reinforced concrete foundation. A simple slab won’t do. You’ll need to pour a concrete pad, ideally at least 15cm thick, and reinforce it with rebar to prevent any future cracking or settling. This isn’t an area to cut corners—a weak foundation will compromise the entire structure.
The Materials List: The success of your project hinges on using the right materials. Based on the design, here’s what you’ll need:
- Bricks: You’ll need two types of bricks. Standard red clay bricks for the exterior are perfect for their aesthetic and durability. For the interior of the firebox and chimney, you must use firebricks (also known as refractory bricks). These are specifically designed to withstand the extreme temperatures of a live fire without cracking.
- Mortar: Just like the bricks, you’ll need two types of mortar. A standard Type S mortar mix is suitable for the outer structure and chimney. However, for the firebrick interior, you must use refractory mortar, which is formulated to resist high heat and prevent failure under thermal stress.
- Structural Supports: To create the openings for the grill and the lower storage area, you’ll need steel angle iron. These will act as lintels to support the bricks above.
- Grates: High-quality grill grates are essential. A durable, heavy-duty stainless steel or cast iron grate is a worthwhile investment that will last for years. You’ll also want a second grate for a charcoal bed or a drip pan below the main cooking grate.
- Top Surface: For the side counter and the top surface of the main structure, you’ll need a non-porous and heat-resistant material like polished concrete, a smooth stone slab, or a treated hardwood.
- Tools: Gather your tools before you begin: a trowel, a brick hammer, a wheelbarrow for mixing mortar, a level (a long one and a small torpedo level), a string line, a wire brush, a tape measure, safety glasses, and gloves.
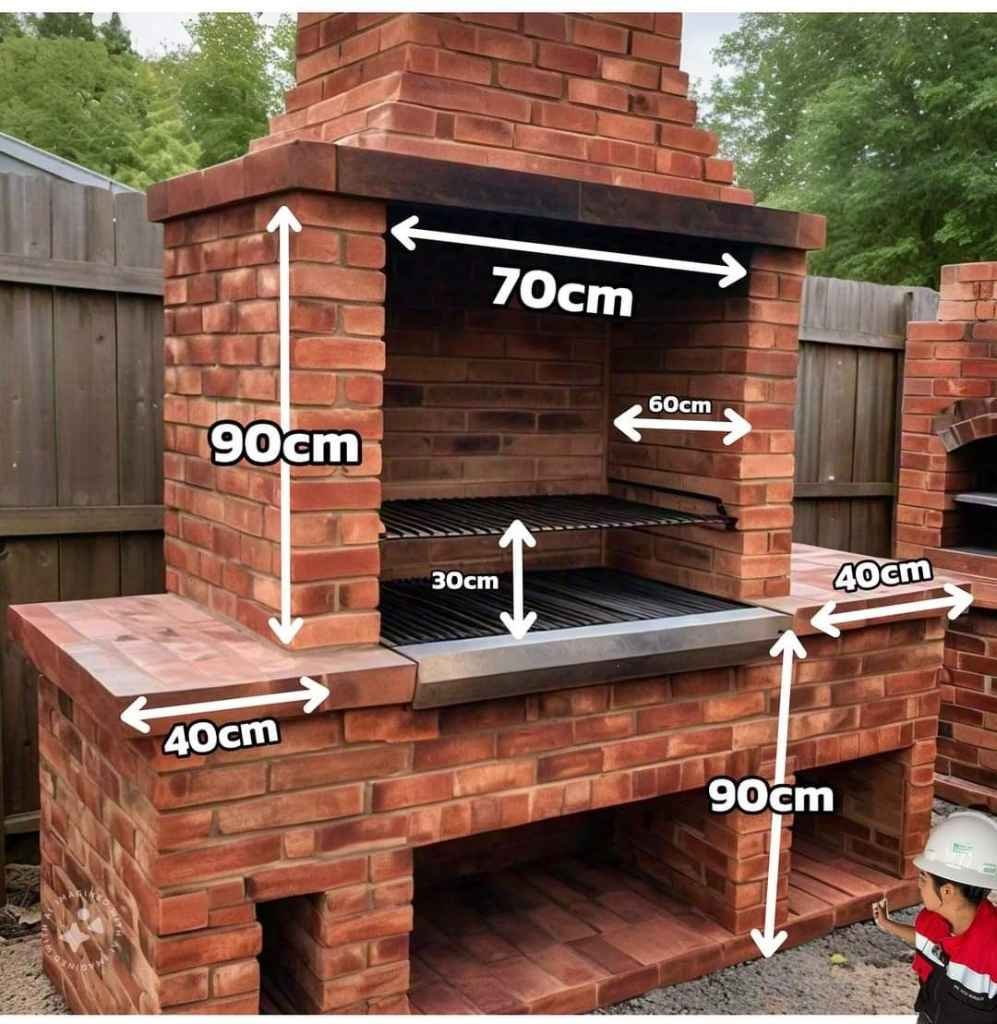
Developing a Blueprint from the Image: Our reference image provides all the critical dimensions for a successful build. The design features a spacious main grilling chamber, an integrated storage area for wood or charcoal, and a convenient side counter. Let’s use the provided dimensions to create a solid plan:
- Main Grill Chamber: The core of the design. The opening is 70cm wide, which is a generous size for cooking for a crowd.
- Chimney & Overall Height: The chimney rises 90cm from the top of the main chamber, providing excellent draft. The overall height to the top of the side counter is also 90cm, a perfect ergonomic height for grilling.
- Grill Grate Height: The cooking grate sits approximately 30cm above the charcoal bed, which is an ideal height for radiant heat cooking.
- Side Counter: The integrated side counter extends 40cm to the left, offering a convenient space for food prep and plating.
- Chimney Depth: The chimney has an internal depth of 60cm, ensuring a proper smoke chamber to draw smoke effectively.
By following these dimensions, you will build a structure that is not only beautiful but also highly functional.
Part 2: Laying the Bricks – The Step-by-Step Construction Process
With your site prepared and materials gathered, it’s time to begin the rewarding work of construction.
Step 1: The Base and First Course Begin by dry-laying your first course of bricks on the concrete foundation. This allows you to plan your spacing and ensure a perfect fit before applying any mortar. Once you’re satisfied, mix your mortar to a thick, workable consistency. Using a string line stretched between stakes, lay your first course, ensuring each brick is perfectly level and aligned. This initial course is the most important—any errors here will be magnified as you build up.
Step 2: Building the Main Body Now, you will build the walls of the lower storage area and the side counter. Continue laying bricks, ensuring each new course staggers the joints of the one below it (known as a stretcher bond). Use your level frequently, both horizontally and vertically, to check for plumb and level. Once you reach the top of the lower storage section, you will install a steel angle iron lintel to support the bricks above the opening. Build up the side counter to the 90cm height, making sure the top surface is perfectly flat to receive your countertop material later.
Step 3: Constructing the Grill Chamber This is where the structure becomes a grill. You will now switch to firebricks and refractory mortar for the interior. The chamber walls should be built with firebricks to a height that allows for the charcoal bed and the grill grates. Install a second set of steel angle iron lintels to support the bricks over the main grill opening. The 70cm width is critical here, so ensure your lintels are cut to size and perfectly level. As you build the side walls of the firebox, you may wish to incorporate brick ledges to allow for adjustable grate heights.
Step 4: The Chimney and Smoke Chamber Once the grill chamber walls are in place, it’s time to build the chimney. This is a crucial step for proper ventilation. You will begin to taper the brickwork inward, creating a smoke chamber that funnels smoke up into the chimney flue. This tapering, known as the “corbel,” should be done gradually to create a smooth, upward path for the smoke. Following the 60cm depth and the 90cm chimney height from our guide, build the chimney upwards. Remember to leave an opening for the smoke to escape at the very top. A chimney cap, while not shown in the image, is a smart addition to keep rain and debris out.
Step 5: The Finishing Touches With the brickwork complete, the final step is to finish the mortar joints. Using a wire brush, clean up any excess mortar. Then, use a pointing tool to compress and smooth the joints, giving the brickwork a clean, professional finish. Now, it’s time to install your countertop slab and the grill grates.
Part 3: Curing, Maintenance, and the Final Reward
Your beautiful new brick BBQ is almost ready for its inaugural fire, but not just yet. It is crucial to allow the mortar to cure properly over several days, or even weeks, depending on the weather. This process ensures the mortar achieves its maximum strength and prevents cracks.
Once the mortar has cured, you must perform a test fire. Start with a very small, gentle fire, and let it burn out. This slowly introduces heat to the brick and mortar, allowing them to expand and contract gradually, preventing major cracks. Repeat this process with slightly larger fires over a few days before attempting a full-size cookout.
Maintaining your brick BBQ is simple. After each use, clean the grates and sweep out the ash. The durable brick structure will last for decades with minimal upkeep.
The final reward for your hard work is a beautiful, functional centerpiece for your backyard. It’s more than just a grill; it’s a testament to your craftsmanship and a new hub for creating memories with family and friends. From slow-smoked ribs to wood-fired pizzas, the culinary possibilities are endless. So, fire it up, and enjoy the fruits of your labor—you’ve earned it.